Tracking electricity and internet uptime with a Raspberry Pi, GNU utils, and Apache on a Linux VPS.
Here in South Africa, we have ongoing issues with load-shedding - planned electricity interruptions to “prevent the collapse of the power system”. This is mostly due to the corruption of the South African government, and the ineptitude of the failing public utility Eskom. On top of that the municipal providers also have major issues keeping their substations working - even outside of load-shedding!
Which is to say, my house is often without power, enough that I have finally made a system to “track” whether the electricity is on at home that I can check remotely. This basically requires that the internet also be working, but given that my ISP is more reliable than the electricity supply it’s not a problem.

📸 Alex Dukhanov @ Unsplash
Project goals
Using the Linux VPS and Raspberry Pi I already have:
- Create a password protected webpage that can tell me if the electricity/internet is on at home
- If it’s off, show me when last it was on
- Make it as simple and reliable as possible
- No database or programming language setup
- Keep historical data for interest/analytics
- If possible, use only built-in GNU/Linux tools!
Check out the code in the Github repository delta1/uptime.
Here’s the result!
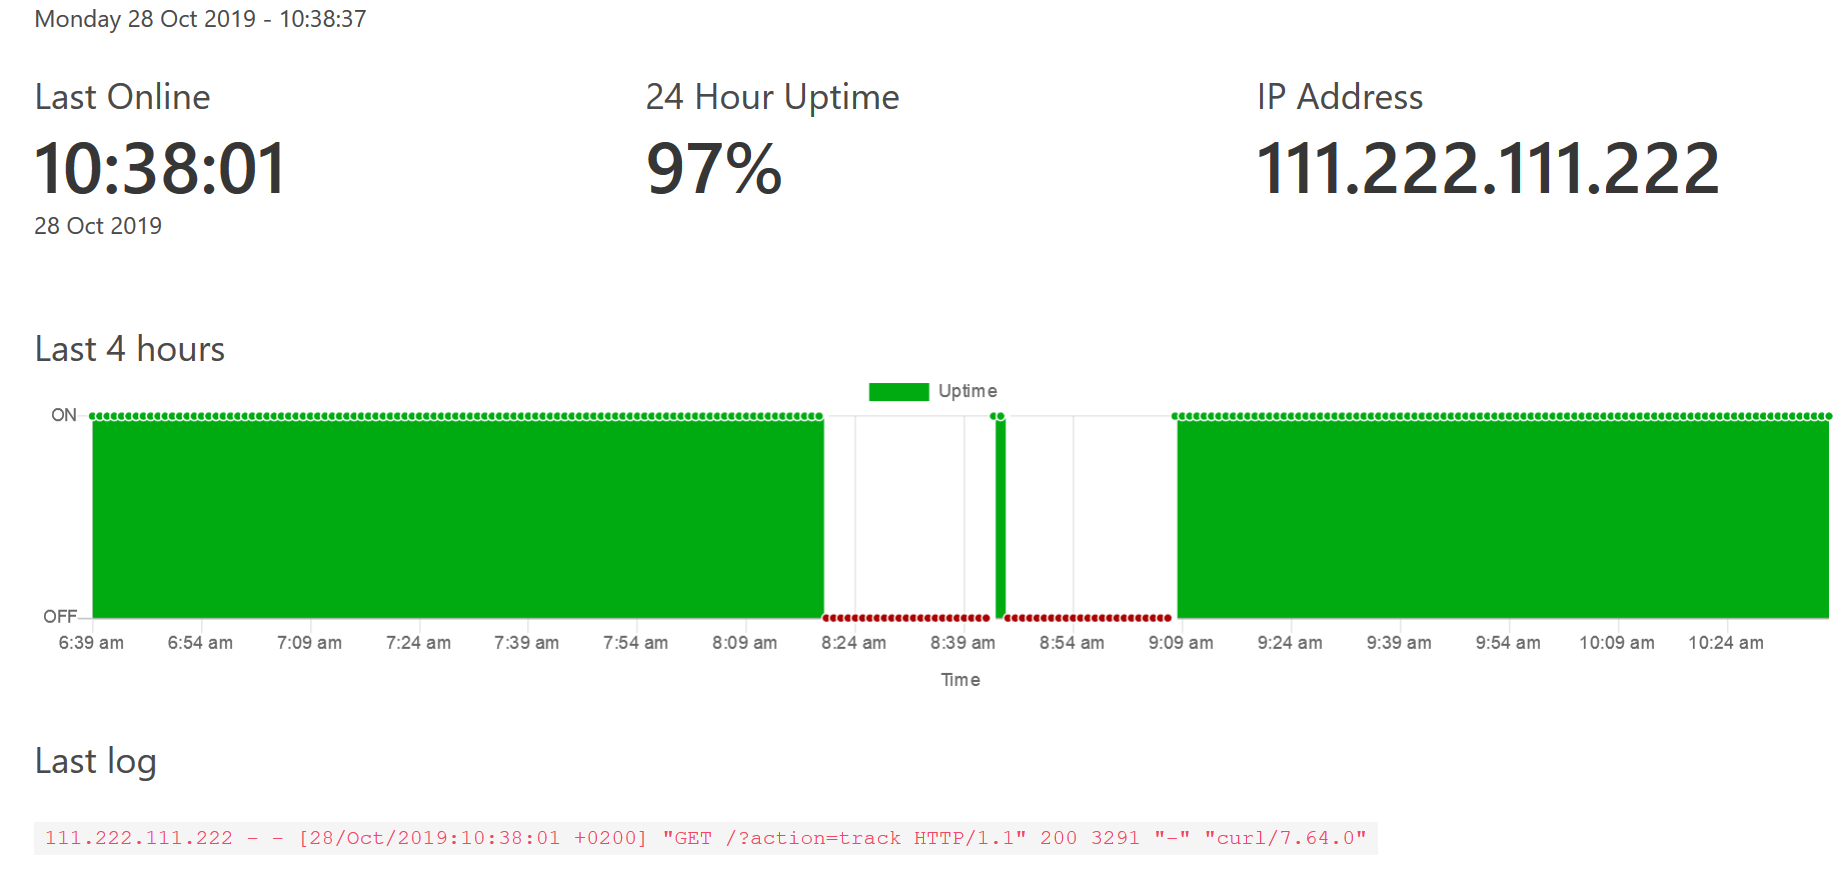
⚡ Electricity tracker online!
How it works
- A cron job on the Raspberry Pi at home uses curl to request a basic HTML page with a specific query string from the VPS every minute it’s online.
- The Ubuntu 18.04 VPS runs Apache HTTP Server to serve a virtual host on a custom subdomain. Apache logs all access requests to a specific file.
- The uptime report page is a CGI bash script. It uses GNU/Linux tools to filter the access log and generate the HTML for the page. It also uses jq to generate a JSON file from the logs to use in a Chart.js graph.
- This page is secured by basic authentication, and TLS thanks to Certbot.
Learning
I love hacking on things like this and trying to find different or interesting ways to solve problems! It’s always a rabbit hole. Here are the things I learnt about in the process of creating this system.
htpasswd
htpasswd is a command line utility that ships with Apache, used for managing the files that store user credentials for basic authentication.
Using it is fairly simple, firstly your Apache configuration defines the basic auth requirements:
<Directory "/path/to/folder">
        # ...
        AuthType basic
        AuthName "Authorization Required"
        AuthUserFile /path/to/folder/.htpasswd
        Require valid-user
        # ...
</Directory>
Then use the htpasswd utility to create the file:
# create a new password file ".htpasswd" for user "admin"
htpasswd -c /path/to/folder/.htpasswd admin
# you will be prompted to enter the password
By default the password is hashed with the Apache MD5 algorithm - let’s see what the file looks like for the password “test”
$ cat /path/to/folder/.htpasswd
admin:$apr1$JTztWOb0$MC.LHwVsu/ZR0iVxq/Ma..
More information about htpasswd options and examples on the documentation site.
logrotate
By default, Apache log files are “rotated” on Ubuntu by the system utility logrotate. Log rotation is the automated process of archiving, compressing, renaming, and/or deleting log files - in order to restrict their size and keep current logs small enough to be viewed.
Configuration files for logrotate can be found at /etc/logrotate.d/. In this case, I want to keep old logs around for analysis later and used the following configuration:
# /etc/logrotate.d/apache2
/path/to/log/*.log {
        # rotate the log files each month
        monthly
        # keep the last 120 versions (10 years of monthly logs)
        rotate 120
        # compress them - if enabled in logrotate.conf base file
        compress
        # delay compression if the log is not closed immediately
        delaycompress
        # use the following Linux permissions, user, and group
        create 640 www-data www-data
        # apache defaults omitted ...
}
Common Gateway Interface (CGI)
CGI is a protocol that enables web servers to execute command line programs on the server to dynamically generate HTML. It was first introduced in 1993, making it the first method of creating dynamic webpages!
I used it here since it was easy to set up in Apache, and as simple as using a bash script to set some variables I could use on the report page.
# Apache config
<Directory "/path/to/folder">
        # ...
        Options +ExecCGI
        AddHandler cgi-script .cgi
        # ...
</Directory>
The contents of the CGI report script: /path/to/folder/cgi/report.cgi
#!/bin/bash

# we need to write the content type header first
# before any content
# followed by an empty line
echo "Content-type: text/html"
echo ""

# filter out the log lines we want that contain action=track
grep action=track ../log/access.log > action.log

# put the last 24+ hours worth into a json file
# but just keep the date strings
# so we can parse them into date objects for the graph
tail -n 1440 action.log | cut -d "[" -f 2 | cut -d "]" -f 1 | sed 's/:/ /' | sed 's/\//-/g' | jq -R -s -c 'split("\n") | map(select(. != ""))' > 1440.json

# set environment variables
export CURRENT_DATETIME=$(date +"%A %d %b %Y - %T");
export LAST_TRACK=$(tail -n 1 action.log);
export LAST_IP=$(tail -n 1 action.log | cut -d " " -f 1);
export LAST_ONLINE=$(tail -n 1 action.log | cut -d "[" -f 2 | cut -d "]" -f 1 | cut -d " " -f 1  | sed 's/:/ /' | sed 's/\// /g');
export LAST_DATE=$(cut -d " " -f 1-3 <<< $LAST_ONLINE);
export LAST_TIME=$(cut -d " " -f 4 <<< $LAST_ONLINE);

# substitute environment variables into the template file
envsubst < template.html

exit 0
Those linux pipelines are pretty terse, here’s a breakdown of line 15 above:
# create a json file of date strings
# each line in action.log resembles this format:
# 111.22.111.33 - [07/Nov/2019:18:47:02 +0200] "GET /?action=track HTTP/1.1"

# take the last 1440 lines from action.log
tail -n 1440 action.log |
# 'cut' each line at the '[' char and take the 2nd part
cut -d "[" -f 2 |
# 'cut' each line at the ']' char and take the 1st part
cut -d "]" -f 1 |
# replace the first ':' char with a space
sed 's/:/ /' |
# replace every '/' char with a dash
sed 's/\//-/g' |
# at this point all that's left are the dates, eg:
# 27-Nov-2019 18:47:02 +0200
# now use the jq utility to create a json file
# with an array of these dates
jq -R -s -c 'split("\n") | map(select(. != ""))' > 1440.json
# explanation of this 'jq' line follows
The command line utilities tail, cut, and sed are free software designed and developed by GNU. They are generally already installed on Linux distributions, and are very useful tools to know.
The last line above uses jq - a “lightweight and flexible command-line JSON processor” - to create a json file with an array of dates.
The jq options and filter used above are as follows:
-R / --raw-input : Don’t parse the input as JSON - since we are inputting lines of strings.-s / --slurp : Read the entire input stream into a large array and run the filter just once.-c / --compact-output : Compact output instead of pretty print.split("\n") | map(select(. != "")) : split the input by newlines into an array, and only keep the values that are not empty
You can read more in the jq manual and tutorial.
envsubst
Instead of printing HTML strings with echo, I wanted to find an elegant way to replace values in a template. I stumbled upon this serverfault.com question and answer which introduced me to envsubst - another beautiful piece of GNU software that “substitutes the values of environment variables” into the input string!
Using envsubst made the CGI program above as easy as exporting some environment variables, and using the HTML page as an input.
# read the file "template.html" into envsubst,
# which substitutes strings like ${NAME} with the env variable NAME
# and writes the resulting output to stdout
# which the webserver sends as a response to the web request
envsubst < template.html
You can see my HTML template in the Github repo.
This was probably my favourite new piece of software I learnt in this project, it easily accomplished what I was trying to do - with a simple built-in command!
Chart.js
I took this opportunity to learn the basics of Chart.js, a popular and free graphing library. The list of samples is impressive, and you can see how I created the graph in the uptime.js file of the repo.
Thanks to Moment.js it was easy to parse and work with dates. Thankfully I don’t have to support any old browsers so I was able to use “new” Javascript features like fetch, async/await, arrow functions, and template literals - without needing a transpilation step.
Previous post: Style updates
Next post: Rust NIFs in Elixir